
I’ve pulled out more failed anchors than I care to admit. Sometimes it was my mistake. More often, I was fixing someone else’s.
The frustrating part? Most anchor failures aren’t mysterious. They’re predictable, avoidable mistakes that keep happening because people either don’t know better or are cutting corners.
Let me save you some grief and walk through the five failures I see most often—and what to do instead.
Mistake #1: Drilling the Wrong Hole Size
This seems stupidly simple, but it’s probably the most common mistake out there.
What goes wrong:
Too small a hole and you can’t set the anchor properly. It bottoms out, won’t expand, or the resin has nowhere to go. Too large and you’ve lost all your holding power.
I watched an apprentice drill holes 2mm oversize for wedge anchors on a steel column installation. “Close enough,” he reckoned. Every single anchor pulled out during the load test. We redrilled the whole lot—80 anchors.
The correct approach:
For mechanical anchors, the hole diameter tolerance is usually +0/-1mm. That’s it. If you spec a 12mm hole, anywhere from 11mm to 12mm is acceptable. 13mm is not.
For chemical anchors, you’ve got slightly more tolerance (usually +2mm), but going oversized means you’re using way more resin than designed for and potentially reducing capacity.
Pro tip: Check your drill bit before starting. Bits wear, especially when you’re drilling hundreds of holes. A worn 12mm bit might actually be cutting 13mm holes. Measure it.
And for the love of everything, use a proper depth gauge. Drilling too shallow means inadequate embedment. Too deep wastes time and might punch through the other side.
Mistake #2: Installing in Cracked Concrete
Walk onto most job sites and you’ll see cracks in concrete. That’s normal—concrete cracks. But anchoring into cracked concrete without accounting for it? That’s asking for trouble.
What actually happens:
Mechanical anchors rely on wedging against solid concrete. A crack means that wedging force can now propagate the crack instead of creating hold. Your capacity drops by 30-60% depending on crack width.
Saw this on a warehouse fit-out. Contractor installed expansion anchors for pallet racking into what looked like solid slab. Except the slab had shrinkage cracks running through it. First load test, three anchors pulled straight out.
How to handle it properly:
First, identify if you’re in cracked or uncracked concrete. AS 5216 defines cracked concrete as anything that could crack under service loads. Old slabs? Assume cracked. Seismic zones? Definitely cracked.
Your options:
- Use chemical anchors (they’re designed for cracked concrete)
- Relocate the anchor away from visible cracks
- Use larger mechanical anchors with reduced capacity
- Get an engineer to specify what’s appropriate
Chemical anchors fill cracks with resin, which actually helps. Mechanical anchors don’t have that luxury.
Red flag: If you can see daylight through the crack, stop. Get an engineer involved. That’s beyond typical hairline cracking.
Mistake #3: Ignoring Edge Distances
This is where people get creative with placement, and it bites them later.
The problem:
Anchors work by distributing load into the surrounding concrete. Get too close to an edge and there’s not enough concrete to distribute that load. The edge spalls off, anchor fails.
Had a bloke install bracket anchors 50mm from a slab edge because “that’s where the column is.” Engineer called for 150mm minimum edge distance. When we loaded it, the corner of the slab just broke away. Looked like someone took a bite out of it.
The rules (simplified):
Minimum edge distance is usually 10x the anchor diameter for mechanical anchors, but check your technical data sheet because it varies.
Examples:
- M12 anchor = 120mm minimum edge distance
- M16 anchor = 160mm minimum
- M20 anchor = 200mm minimum
Chemical anchors can often work closer to edges (maybe 6-8x diameter), but you’re still playing with reduced capacity.
What to do when you can’t meet edge distance:
Don’t just install it anyway and hope. Your options:
- Use chemical anchors with engineer-approved reduced capacity
- Use specialized edge anchors
- Redesign the connection
- Reinforce the edge
I keep a copy of edge distance tables in my truck. When layout doesn’t work, I know it immediately rather than after installation.
Mistake #4: Poor Hole Cleaning
If I had a dollar for every time I’ve heard “it looks clean enough,” I could retire.
Why this matters so much:
Chemical anchors bond to concrete, not to concrete dust. Leaving dust in the hole reduces bond strength by up to 50%. You’re basically gluing a rod to dust instead of stone.
Mechanical anchors aren’t as sensitive, but concrete dust still prevents proper expansion and reduces friction.
The horror story:
Commercial tower project, hundreds of chemical anchors for curtain wall brackets. Installer was in a hurry, did a quick blow-out with compressed air and called it good.
Load testing failed on 40% of the anchors. Had to pull them all, re-clean the holes properly, and reinstall. Cost the contractor about $35,000 in delays and rework.
The actual procedure (for chemical anchors):
This is straight from AS 5216:
- Drill hole
- Brush with proper wire brush (not just any brush—one that matches the hole diameter)
- Blow out with oil-free compressed air
- Brush again
- Blow out again
- Brush a third time
- Final blow out
Yeah, three times. It’s not overkill—it’s the standard.
For mechanical anchors, two cycles of brush and blow is usually sufficient, but don’t skip it.
Investment worth making:
Get a proper hole cleaning kit. You’re looking at maybe $200 for brushes and a decent compressed air setup. That’s nothing compared to one failed inspection.
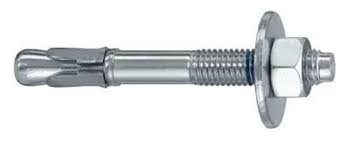
Mistake #5: Wrong Anchor for the Application
This is the big one. People grab whatever anchor is on the truck and make it work. Sometimes it works. Often it doesn’t.
Common scenarios I see:
Using expansion anchors overhead: These rely on gravity to keep them in place. Turn them upside down and you’re counting on friction alone. Drop-in anchors or chemical anchors are better for overhead work.
Using sleeve anchors for high loads: Sleeve anchors are convenient and cheap. They’re also not designed for heavy structural loads. I’ve seen them specified for applications way beyond their capacity.
Chemical anchors in wet holes: Standard chemical resin doesn’t work in wet conditions. You need special underwater resin or you need to dry the hole first.
Light-duty anchors in dynamic loads: Vibration and movement destroy wedge anchors over time. Saw this on a compressor mount—anchors were fine initially but worked loose after six months of vibration.
The fix:
Match the anchor to the actual application:
Static loads, good concrete, not near edges: Mechanical anchors (wedge, sleeve, drop-in) work fine.
High loads, structural applications: Chemical anchors or cast-in anchors.
Cracked concrete, edge applications, seismic zones: Chemical anchors almost always.
Overhead applications: Drop-in anchors, chemical anchors, or through-bolts. Not expansion anchors.
Vibration or dynamic loads: Chemical anchors or specialized mechanical anchors with locking features.
Temporary installations: Mechanical anchors (because you can remove them).
When in doubt, check the technical data sheet. Every anchor has a load table showing what it’s rated for under different conditions.
Bonus Mistake: Overtightening
While we’re at it, let’s talk about torque because this kills more anchors than people realize.
What happens:
Expansion anchors work by expanding against the hole walls. Overtighten them and you either:
- Strip the threads
- Crack the concrete
- Deform the anchor so it actually loses capacity
I’ve seen blokes with impact guns just send it until the anchor strips. “Tight is good, tighter is better,” right? Wrong.
The correct approach:
Use a torque wrench. Check the technical data sheet for specified torque values. Follow them.
Typical ranges:
- M10 anchors: 40-50 Nm
- M12 anchors: 80-100 Nm
- M16 anchors: 150-200 Nm
These are guidelines—actual values depend on anchor type and application. But the point is they’re not “as tight as you can get it.”
For structural applications, torque values are often specified by the engineer. That’s a requirement, not a suggestion.
What About Installation in Different Concrete Strengths?
Good question. Anchor capacity is rated for specific concrete strengths (usually 20-25 MPa minimum).
If your concrete is weaker:
- Anchor capacity reduces proportionally
- You might need larger or more anchors
- Chemical anchors are less affected than mechanical
If your concrete is stronger:
- You don’t automatically get higher capacity
- The anchor itself becomes the limiting factor
- Still use the rated capacity from the data sheet
How to check concrete strength:
For commercial work, you should have test results from when the slab was poured. If not, you can do:
- Schmidt hammer testing (gives estimate)
- Core sampling (accurate but destructive)
- Pull testing on sample anchors
Don’t assume old concrete is weak or new concrete is strong. Test it.
The Core Issue Behind Most Failures
You know what ties most of these mistakes together? People treating anchor installation as unskilled work.
“Just drill a hole and stick something in it.”
Except anchor installation is skilled work. It requires understanding:
- Material behavior
- Load paths
- Installation procedures
- Quality control
The best anchor in the world fails if installed incorrectly. And a mediocre anchor installed properly often outperforms it.
When to Call in Professional Help
Some applications are beyond “wing it and see”:
Definitely get engineering input for:
- Structural connections
- Overhead heavy loads
- Seismic applications
- Cracked or deteriorated concrete
- High-consequence failures (public safety areas)
Engineering input might cost $1,500-3,000 for a typical project. Failed anchors and rework cost way more.
Quick Pre-Installation Checklist
Before you start drilling:
☐ Verified concrete strength meets anchor requirements
☐ Checked for rebar location (don’t drill into it)
☐ Confirmed correct anchor type for application
☐ Have correct drill bit size and depth marked
☐ Hole cleaning equipment ready
☐ Edge distances marked and verified
☐ Load requirements match anchor capacity
☐ Installation tools ready (including torque wrench if needed)
The Bottom Line
Most anchor failures aren’t bad luck. They’re predictable results of skipping steps or using the wrong product.
Drill the right size hole. Clean it properly. Respect edge distances. Use the right anchor for the job. Follow torque specifications.
None of this is complicated. It just requires paying attention and following the process.
I’ve never regretted taking an extra 30 seconds to do an anchor installation properly. I’ve regretted plenty of times I rushed it.
Need help selecting the right anchors for your application? TOPFIX’s technical team can review your requirements and recommend appropriate products. Call 1300 867 349 or visit our Moorebank showroom.